|
|
 |

The term "high pressure" is relative, as, in fact, are all pressure measurements. What the term actually means depends greatly on the particular industry one is talking about. In synthetic diamond manufacturing, for example, normal reaction pressure is around 100,000 psig (6,900 bars) or more, while some fiber and plastic extruders operate at 10,000 psig (690 bars). Yet, in the average plant, pressures exceeding 1,000 psig (69 bars) are considered high.
In extruder applications, high pressures are accompanied by high temperatures, and sticky materials are likely to plug all cavities they might enter. Therefore, extruder pressure sensors are inserted flush with the inner diameter of the pipe and are usually continuously cooled.
 |
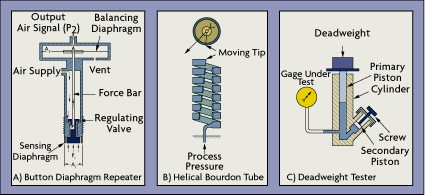
| Figure 4-1: Mechanical High Pressure Sensors
|
High Pressure Designs
In the case of the button repeater (Figure 4-1A), the diaphragm can detect extruder pressures up to 10,000 psig and can operate at temperatures up to 8000¡F (4300¡C) because of its self-cooling design. It operates on direct force balance between the process pressure (P1) acting on the sensing diaphragm and the pressure of the output air signal (P2) acting on the balancing diaphragm. The pressure of the output air signal follows the process pressure in inverse ratio to the areas of the two diaphragms. If the diaphragm area ratio is 200:1, a 1,000-psig increase in process pressure will raise the air output signal by 5 psig.
The button repeater can be screwed into a H-in. coupling in the extruder discharge pipe in such a way that its 316 stainless steel diaphragm is inserted flush with the inside of the pipe. Self-cooling is provided by the continuous flow of instrument air.
Another mechanical high pressure sensor uses a helical Bourdon element (Figure 4-1B). This device may include as many as twenty coils and can measure pressures well in excess of 10,000 psig. The standard element material is heavy-duty stainless steel, and the measurement error is around 1% of span. Helical Bourdon tube sensors provide high overrange protection and are suitable for fluctuating pressure service, but must be protected from plugging. This protection can be provided by high-pressure, button diaphragm-type chemical seal elements that also are rated for 10,000-psig service.
An improvement on the design shown in Figure 4-1B detects tip motion optically, without requiring any mechanical linkage. This is desirable because of errors introduced by linkage friction. In such units, a reference diode also is provided to compensate for the aging of the light source, for temperature variations, and for dirt build-up on the optics. Because the sensor movement is usually small (0.02 in.), both hysteresis and repeatability errors typically are negligible. Such units are available for measuring pressures up to 60,000 psig.
Deadweight testers also are used as primary standards in calibrating high-pressure sensors (Figure 4-1C). The tester generates a test reference pressure when an NIST-certified weight is placed on a known piston area, which imposes a corresponding pressure on the filling fluid. (For more details, see Chapter 3 of this volume.) NIST has found that at pressures exceeding 40,000 psig, the precision of their test is about 1.5 parts in 10,000. Typical inaccuracy of an industrial deadweight tester is 1 part in 1,000 or 0.1%.
In the area of electronic sensors for high-pressure measurement, the strain gage is without equal (see Chapter 2 for more details on strain gage operation). Strain gage sensors can detect pressures in excess of 100,000 psig and can provide measurement precision of 0.1% of span or 0.25% of full scale. Temperature compensation and periodic recalibration are desirable because a 1000¡F temperature change or six months of drift can also produce an additional 0.25% error. Other electronic sensors (capacitance, potentiometric, inductive, reluctive) are also capable of detecting pressures up to 10,000 psig, but none can go as high as the strain gage.
 |
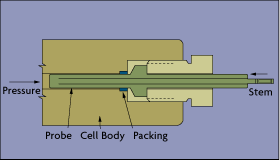
| Figure 4-2: Bulk Modulus Cell
|
Very High Pressures
The bulk modulus cell consists of a hollow cylindrical steel probe closed at the inner end with a projecting stem on the outer end (Figure 4-2). When exposed to a process pressure, the probe is compressed, the probe tip is moved to the right by the isotropic contraction, and the stem moves further outward. This stem motion is then converted into a pressure reading. The hysteresis and temperature sensitivity of this unit is similar to that of other elastic element pressure sensors. The main advantages of this sensor are its fast response and safety: in effect, the unit is not subject to failure. The bulk modulus cell can detect pressures up to 200,000 psig with 1% to 2% full span error.
In another high-pressure design, Manganin, gold-chromium, platinum, or lead wire sensors are wound helically on a core. The electrical resistance of these wire materials will change in proportion to the pressure experienced on their surfaces. They are reasonably insensitive to temperature variations. The pressure-resistance relationship of Manganin is positive, linear, and substantial. Manganin cells can be obtained for pressure ranges up to 400,000 psig and can provide 0.1% to 0.5% of full scale measurement precision. The main limitation of the Manganin cell is its delicate nature, making it vulnerable to damage from pressure pulsations or viscosity effects.
Some solids liquefy under high pressures. This change-of-state phenomenon also can be used as an indication of process pressure. Bismuth, for example, liquefies at between 365,000 and 375,000 psig and, when it does, it also contracts in volume. Other materials such as mercury have similar characteristics, and can be used to signal that the pressure has reached a particular value.
|

